Facebook is making it easier and easier for brands to sell products. Thanks to the Shop tab, you can customise your page with your products and services, alert people to sales and much more. Once your products are on your page, you can tag them in your posts to help drive sales.
This guide will show you how to set up your Shop tab, add products and then tag them in posts. We’ll also give you our top tips on how to make the most of these valuable social tools.
Finding Shop Tab on Your Facebook Page
To find your tabs on your Facebook page, go to Settings > Edit Page. Here you will find the tabs menu. From this menu, you can choose which Tabs will appear on your page. With default tabs switched off, you can add the tabs you need. To add products, select the Shop tab.
Once added, you can move the Shop tab up the list by clicking and dragging it. This allows you to order your tabs the way you want. In the Settings you can switch the tab on and off, as well as find the Shop URL for sharing.
Setting up a Facebook Shop
To add products to your Facebook page, visit your new Shop tab. After agreeing to the Ts & Cs, you must select your checkout method. You can either direct your customers to your website to complete their purchases, or you can let people message you on Facebook to arrange purchases.
The method you choose will depend on your social media strategy and website capabilities. Sending people to your website offers the obvious benefit of site traffic, but it also offers another benefit. With the sale being completed on your website, your sales tracking and ecommerce data stays in one place. The last thing you want is to have to go to multiple places to find all your sales data.
Opting for messages is useful for certain products/services that aren’t normally purchased through ecommerce or have a range of customisation options. An example of this could be a fixed rate consulting service.
Next, you are prompted to choose your preferred currency. Once you’ve done that, your shop is ready! Now let’s add some products.
Adding Products to your Facebook Shop
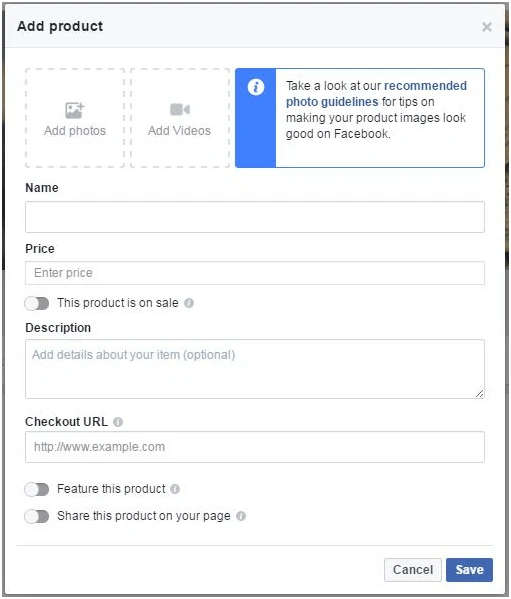
Clicking the Add Products button will bring up this window:

To add a product to your Facebook page, simply fill out the fields with your product and click Save. If you have a product on sale, you can post the sale price to attract your customers. Make details of your products concise and useful and choose a high quality image.
Top Tip! Products must have a fixed price.
If you want to feature a certain product, select the option. This will put your product at the top of your Facebook Page to better attract customers.
Tagging Products in your posts
Now that you have a shop full of products to sell, you can tag them in posts that reference them. To tag a product on a Facebook post, select this button:

This will create a dropdown menu containing your products. Select the products you’re talking about and finish your task as usual. This will tag your products in the post just like tagging a friend. When people click the products, they are taken to your Shop so they can buy them.
Top Tip! One limitation of tagging products is that you can’t add links to other content with previews on them.
Benefits of Tagging Products in Facebook
Tagging products on Facebook allow you to outreach your products directly to your audience without the need for Facebook like ads. Your Facebook posts will appear in your audience’s Facebook feed and allow them to buy your products directly from that post. They also take up more valuable space on your users’ feeds, making them stand out.
This makes your sales advertising fit more naturally into your audience’s lives. It increases the likelihood of an impulse purchase and allows you to use the post to put your products into real life context.


